 Social media marketing can be challenging, especially when putting out ads. It doesn’t always offer the best user experience right off the bat, it takes a lot of practice and experience to understand how to do social media ads correctly.
Today, let’s focus on your Facebook ads, and deleting any that you currently have in your account that may be “disapproved”.
In this article, you will learn why it’s important to delete them and walk you through step-by-step exactly how to delete them.
How Disapproved Ads Affect Your Account
Facebook changes its advertising policies and rules VERY frequently, and most of the time without notice.
This means you log in to your account one day to find that an ad that you had running is all of a sudden disapproved, and that is really frustrating. This can in turn lead to ad accounts getting disabled for ads that aren’t even live, which just adds to the frustration if you haven’t run the ads for a while.
Facebook uses algorithm-driven automations (that’s just a fancy word for a machine), to determine if an ad violated any of their policies and as we all know, machines can break. These “machines” can malfunction, which results in your ad being flagged for breaking the rules when you might not have.
If an ad account is disabled, getting it back can be a real struggle. A lot of the time, once an ad account is disabled, it will stay that way even if it’s because of a “machine malfunction”.
Trust me, I’ve had this fight a few times now with clients who have whole ad accounts disabled and shut down, and only on ONE occasion have I been able to get Facebook to restore the account.
While you always want to do your best to follow Facebook’s rules and ad policies, everyone starts out making mistakes and learning along the way.
When your ad account is “healthy”, it helps to make sure future ads aren’t jeopardized by past mistakes, which is those ads that you had disapproved and just decided to turn off instead of getting rid of.
So, here’s how we can limit the chance Facebook will shut down your ad account and ad content for past ads that have been disapproved…
1. Find Out When Your Ad Was Disapproved
The first step is to figure out when the ad was disapproved, which you can do inside Business Manager notifications, Ads Manager notifications, or in your email.
To access your Business Manager notifications, head to business.facebook.com and select the Business Manager account that you ran the ads through that were disapproved.
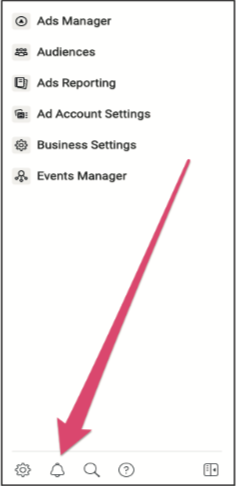
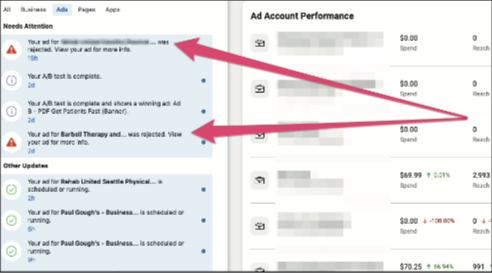
Then click the bell icon in the bottom-left corner of the screen (see image, right). In the notifications, you’ll see ads that are scheduled or running, as well as disapproved ad notifications.
You can see a screenshot below of what you’re looking for once you’re in Business Manager.
Once you know the date of when your ads were disapproved, either through the method above or in your emails, you want to set your Ads Manager to reflect those dates.
To do that, when you’re in Ads Manager, you will see a box on the right-hand side that will tell you the date range your ads are currently set to.
It normally defaults to the last 7 days, but if you’ve changed it before, it will be on that same setting. Choose the date range that you know your ad campaigns were disapproved of.
2. Reveal Disapproved Ads
Now that you’ve narrowed down the date, you then want to filter the data to show only those problematic ads. The reason we’re doing it this way (by filtering) is to make sure you don’t accidentally delete an ad that is working and doing well for you.
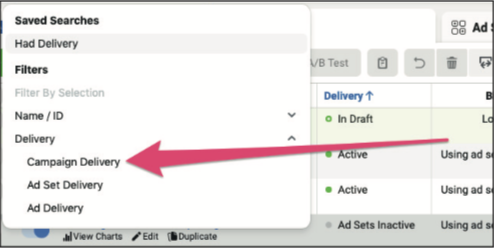
You need to use the “Filter” tab
inside your Ads Manager and select the “Campaign Delivery – Errors” option from the dropdown that appears (as shown in the second image on the right).
Ads Manager now shows ads that have errors and/or were disapproved or rejected by Facebook’s ad policy team during the time frame you’ve selected.
3. Document Disapproved Ads
This step is a great idea, as it prevents you from making the same mistake again in the future, and means your process of running Facebook Advertising should be a lot smoother now you know the type of things to avoid so that your ads aren’t disapproved.
As a general rule for Facebook ad account health, you should always have more ads approved than ads rejected. Knowing your ratio of approved to disapproved ads can be helpful if you do ever have to work some damage control with the Ad Policy Team. The healthier your account, the more lenient Facebook will be to you in the future, so it really does pay to keep on top of your disapproved ads.
 How you document them is up to you. You can have a spreadsheet that has the ad copy and image of each disapproved ad, or screenshots of each preview of the ad and the reason behind it being disapproved so you can analyze the reason and learn from your mistakes. (Mistakes we all make, by the way, so don’t worry!)
4. Delete Disapproved Ads from Ads Manager
Once you’ve documented your disapproved ads, it’s now time to delete them from your account.
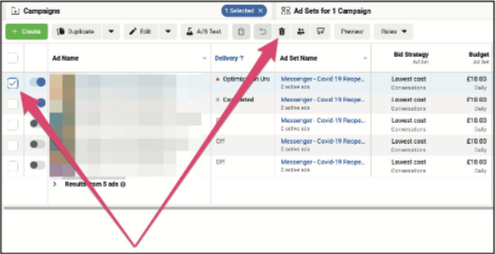
If you have entire campaigns or ad sets where every ad inside is disapproved, you can delete the entire campaign or ad set. But, if you’re only targeting one ad that was disapproved, select the checkbox to the left of the ad at the ad level of your campaign, then click the “Trash” icon, and voila! (See image below)
You’re now done and dusted with disapproved ads plaguing your account and meaning Facebook is keeping a closer eye on your ads than usual.
It’s important to note that Facebook gauges your ad account’s health based on your history of advertising on the platform. If your account is filled with disapproved ads that you just turned off, this counts against you regardless of how many of those ads you document and delete.
 This doesn’t mean that your ads will never get flagged again, but it does help decrease the chances of old ads getting flagged and causing your account to be shut down – which none of us want.
Now if you’d like more help on this topic or Facebook ads in general, and would like to have someone do it for you, you can sign up for the Online Domination program, where the team at Paul Gough Media will take care of and manage your social media ads for you!
Hopefully, you’ve found this article helpful and that you’re now able to have the peace of mind that your Facebook ad account is as healthy as it can be, which is exactly what you want.
Could You Benefit From Working With Paul’s Team to Improve Your Google and Facebook Marketing?
Is your business reaching its online potential when it comes to digital marketing? Just how many patients can you reach if you start using Facebook and Google?
Book a free call with our online marketing expert to discover just how many patients you can get in front of and how you can improve your online presence and ultimately get a higher number of leads and more patients each month coming to you via online marketing.
We have 4 FREE discovery calls available, click to book now!

